Monday, 8 February 2010

VALENTINE MAILBOX THE CUTTLEBUGSPOT


Good evening
Over at the Cuttlebugspot this week Nilda asked us to alter a Target mailbox. These are cute little mailboxes that you can buy at Target in the US for a dollar. Being from the UK we don't have them over here but I managed to buy an SVG file for SCAL at Lindsay's Stamp Stuff.
I have to say that compared to the fabulous mailboxes my DT sisters came up with mine is rather plain! By the time I had glued mine together I was losing the will to live lol! that will teach me to plan ahead!
So my doors are embossed with the gorgeous Romantic Words CB folder and I cut a little red mirricard heart lock charm and snipped of the charm bit and key from Sweethearts Cricut Cart. The small red random hearts paper was a free download from Printable Heaven. The edges are decorated with red felt heart ribbon from Hobbycraft and the The diecut hearts and words are from the A2 Combo Love Language. Where the box opens I thought it would be sweet to have a little cupid to greet you so I cut him @2 1/2 " (Sweethearts cart) twice in black and twice in red mirricard and just used the heart which i layered on him to strengthen him. He is then adhered to some folded acetate so he stands freely at the entrance of the mailbox surrounded by yummy chocolate hearts. A few red gems to finish.
We would love to see your decorated boxes over at the Cuttlebugspot so why not join us in the challenge this week!
Have a great week everyone!
Juliexx

Wednesday, 3 February 2010

VALENTINE HEART PEGGY LOVES VINTAGE


Good morning
There's a contest going on over at Peggy loves Vintage blog! All you have to do is create something with the beautiful free vintage image Peggy has on her blog, you have until 12th February to enter and there is a prize for the winner too! Just leave a comment and link your creation on the post with the free download.
I made a card and a little heart box filled with little love heart candies.
My card is 6x6" and backing paper is Pink Petticoat stripe download.I thought that stripes were in keeping with the gorgeous free vintage heart image. The heart is printed out twice for the card and I fussy cut it once then just cut the heart out which is popped and embossed with one of my new Romance CB folders love hearts (hence the love heart candies too match!) The sentiment is computer generated in blue, font is Bauhaus Script and hearts are Cheri font printed on white and layered on pink card that has been punched with my Fiskars Apron Lace border punch. An organza and satin pink ribbons to finish off. The box is a paper mache box from Hobbycraft which I painted with pink acrylic paint then covered the sides with the striped paper and narrow pink silk ribbon. I cut the heart three times for the box and fussy cut twice for the base and lid and the heart once which I again embossed and added some ribbon.
I hope you can join in the contest over at Peggy's blog and don't forget to pick up your gorgeous free heart image and have a look at Peggy's other gorgeous vintage images too!
I am also entering this card and box over at By The Cute and Girly Challenge which is the theme of love this month
Thanks for looking and have a lovely day
Juliexx

Monday, 1 February 2010

LILY-BOOTOO FEBRUARY CHALLENGE - A CARD RECIPE


Good morning on this fine and frosty morning!
It's time for the February challenge over at Lily-Bootoo and this month we have a little card recipe for you to follow.
Recipe:
1 ribbon
1 tag
That's all you need to incorporate within your card design to enter!
For my card I used yummy cupcake from Collection6 Celebrations there are 6 gorgeous yummy cake and other images created by Sam in this collection and for only £1.99 which you can see at LIly-Boos Boutique, they are so versatile!
My card is 5x7" and the background paper is Pink Petticoat download. I printed the cupacke out once for the base and three times more on patterned Pink Petticoat papers so I could paper piece and layer. The cupcake case layer is pop dotted one layer and the frosting is pop dotted 2 layers. On the second layer of the frosting I made a cut down the middle and this is where I placed the real birthday candle so that the top layer when pop dotted lay flush over the top (hope this makes sense!) The image is layered on to silver adhesive glitter paper and silver glitter added to the stars on the frosting. I added some black and white polka dotted ribbon and a little tag in keeping with the challenge recipe. The sentiment and tag are computer generated font is Cheri.
I do hope you can join us at Lily-Bootoo this month we love to see your gorgeous creations and the winner can choose 2 of Lily-boos collections as their prize!
Have a great week everyone!
Juliex

Monday, 25 January 2010

SILVER AND BLACK. THE CUTTLEBUGSPOT


Good evening
Over at The Cuttlebugspot this week we are having a silver and black challenge! My DT sister have created the most beautiful cards and projects so I hope you will pop over and take a look!
I decided to make a shoe shaped card and little bag favour which I thought would be nice for a piece of jewellry for a gift.
I used my latest addition to my Cricut carts Forever Young. I love this card it's packed with the most gorgeous girly cuts! I welded the high heeled shoe in DS to make a card and then cut the shoe card in black then one shoe in silver mirricard and the top of the shoe in black mirricard. I cuttled the black mirricard with the CB folder Tiny mosaics. The bag is cut from the same cart (no glue required!!) and cuttled with the same folder to match. As you can see I added loads of silver gems to both the shoe card and the bag, the sentiment on the shoe is a rub on from my stash. Gosh I remember wearing high heels like this many years ago I would probably have trouble just standing up on them now lol!
There is a change in the rules for the challenges going forward . We would still love to see your take on the challenge but as long as you leave a comment you will be in with a chance to win the weekly prize which this week is a $20 voucher for Custom Crops!
Have a great week everyone!

Sunday, 24 January 2010

THE GRADUATE. THE GYPSYSPOT CHALLENGE


Hello all
Over at the Gypsyspot they have changed the rules so that if you don't have the Gypsy or DS you can still join in the challenges using cuts from your Cricut!
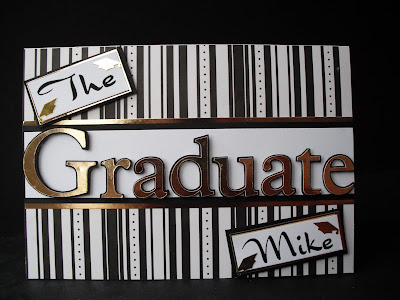
This week the challenge is 'Black and Gold' so I thought I would join in as I recently made a card for a Graduate.
This card was made for my friend's husband who has just got a Master's degree and being a mature student I made this card non fussy using Plantin Scool Cricut cart for the word Graduate.
So pop over and take a look as there is a fabulous prize on offer, one of the new mini carts Lovestruck!
have a great weekend everyone!
Juliexx

Tuesday, 19 January 2010

1OTH BIRTHDAY CARD CUTTLEBUGSPOT


Good evening
I hope everyone is having a good week!
Over at the Cuttlebugspot this week Nilda asked us to create something using the number 10 or word Ten. Well my imagination wasn't on top form lol so I created a simple 10th birthday card.
I used a DL card and the A2 embossing folder is from CB Birthday wishes A2 combo set. A bit of trivia for you did you know there are 14 candles on this folder! So I cut my paper down so it had 10 candles!. The black number paper is from an old DCWV paper pad. 10 is cut from Don Juan cricut cart at 2 1/2" on shadow in black and base in white then cuttled with Stripey QK folder. The striped paper across the middle is Pink Petticoat and I cut three red mirricard stars from Plantin School cart (I think they are 1") and cuttled them with Tiny Bubbles CB folder. Happy birthday is computer generated and matted on black . All pop dotted for dimension.
We do hope you can join us at the Cuttlebugspot this week we would love to see what you create and there's a fab prize for the winner Of a $20 voucher for Custom Crops!
Juliexx

Saturday, 16 January 2010

VALENTINE PEGGY LOVES VINTAGE


Good evening
I love this cute Valentine image from Peggy Loves Vintage and just had to make a card with her!
I used a 6x6" card and the red polka dot paper is printed from Pink Petticoat Fairy Lights CD. I printed the image twice and cut out the hat, dress, shoes and heart. I embossed the heart, dress and hat with Swiss Dots CB folder and pop dotted for dimension. I made some matching blue paper to match the hat in my computer graphics programme and punched a heart border. The image is layered on this and then black. Each layer is pop dotted and I added pearls to the hearts. I added some lace which I received from my lovely blogging friend Lana last year and some pearl stick pins which I coloured black with permanent marker. Lastly I added two of the punched out hearts and xoxo which is die cut using A2 combo Love Language.
Peggy Loves Vintage has the most gorgeous vintage images so please pop over and visit her shop you will love them as much as I do!

LinkWithin

Related Posts with Thumbnails